I found various instructions to create a FreeBSD image in Google Compute but non of those instructions where complete of functional. Here are the correct instructions.
Showing posts with label Scripting. Show all posts
Showing posts with label Scripting. Show all posts
Monday, January 8, 2018

Monday, June 19, 2017
Restricting Access at in Varnish Server Wide to Admin Areas
There are lots of ways to implement access controls and additional security on your hosting. I recently implemented a very restrictive but easy to manage implementation for our FreeBSD server that runs everything through Varnish. I could have placed this restriction in Apache via .HTACCESS files or global rules but placing them in Varnish they execute earlier and have less server overhead and ensure there are no caching related flaws.
Read XML Sitemap to a CSV File
You may need to process a sitemap for redirects or get a list of all your pages for some testing or monitoring process. Here is a simple script you can run to convert your sitemap to a CSV file. It even supports multi-file sitemaps.
Wednesday, October 26, 2016
Removing Double Redirects or Redirect Chains form .htaccess files.
If you manage and large site using mod_rewrite or ISAPI_Rewrite 3 you will eventually run into issues maintaining the rewrite rules. After doing a few redesigns or moving things around repeatedly you can end up with situations where one page redirects to another page then another and so on in a chain. This is functional but inefficient, it can have a negative effect on user experience and on SEO value, and makes everything harder to maintain. This tool is a simple script you can pass you
.htaccess file through to remove all these multi-step redirects and all pages redirect immediately on the first redirect to the final destination page.Monday, December 28, 2015
Quick and Dirty OCR on OS X for Free
Wait, Stop, Don't spend that $80+ on some fancy OCR software just yet. There are some free open source tools out there and with a bit of work you can have very functional workflow using them and OS X. This guide will help you set up an applet you can drop images onto to OCR them to plain text. This will not create PDF's, formatted, or indent documents, but rather just one large text block that is structured the same as the source text with line breaks. The following tools are used, but instructions are provided below so you don't need to download anything from the sites.
Thursday, January 29, 2015
jQuery .ensure() Function to Wait for a Condition Before Executing Code
Overview
This is a very nice little plugin I wrote for jQuery to handle situations that don't have callbacks. You can do this manually in code by adding a timeout but what if the function takes to long, or what make users with a faster device wait for slower devices by over estimating the timeout.Please note that most libraries have their own callbacks and jQuery had a
$().done() mechanism that will do this for common functions and libraries. This solution is for those odd ball code bits that don't or that you don't have control over.It takes a few pieces of information:
selector- The root jQuery selector you are binding to, it will become the this in the isValid call.
- If your waiting for a new item to be created do
$(document).ensure(selector).done(). isValid(default$(this).exists())- This is the function that is run each iteration.
- It should be optimized and return a bool result. Ie don't walk the DOM every time, select the proper parent node into a variable or pass as the selector.
delay(default500milliseconds)- Miliseconds between each iteration.
tries(default0)- Maximum number of times to try,
0for unlimited.
Examples:
Source Code:
Tuesday, July 24, 2012
jQuery Plugin to Scroll an Element with the Page
Updated 11/7/2013: Added support for positioning via padding instead of margins.
This simple javascript plugin is a very simple bit of code that can be attached to any element on a web page. It will make the element work similar of a position:fixed element in that it will cause the element to scroll with the browser window vertically as the user scrolls up and down.
The benefit of this over the css attribute is that this method will retain the items original placement and flow instead simply adjust the margin-top to replicate the scrolling logic. Additional paddingTop and paddingBottom can be specified witch will act as minimum margins between the viewport and the floating item.
Sample Code:
The query Plugin code is available on GitHub here. You will need to include jQuery and then this file in your page header to use it.
This simple javascript plugin is a very simple bit of code that can be attached to any element on a web page. It will make the element work similar of a position:fixed element in that it will cause the element to scroll with the browser window vertically as the user scrolls up and down.
The benefit of this over the css attribute is that this method will retain the items original placement and flow instead simply adjust the margin-top to replicate the scrolling logic. Additional paddingTop and paddingBottom can be specified witch will act as minimum margins between the viewport and the floating item.
Sample Code:
$("#element").autoScroll({ paddingTop: 30 });
The query Plugin code is available on GitHub here. You will need to include jQuery and then this file in your page header to use it.
Friday, July 6, 2012
Web Form Validation the Right/Simple Way.
Another topic that isn't all all new. There are millions of forms out there and they all do user input validation differently. The long and the short of this article is that there are many approaches but we want a best practice that meets a few requirements. It must be quick, efficient, simple to configure, but able to do all the validation logic we may need. There are lots of frameworks or custom code to do this but as I mentioned I am going for the most elegant solution here. So here is goes, here is a sample form with the validation logic.
This might look quite impel but in reality is is doing nearly all the validation we need for this simple form. I am using the jQuery Validation plugin to do all the heavy lifting here. This is also a very elegant solution. You will notice that there is only one javascript call on the page yet all the fields are being validated. How you ask? While the documentation doesn't covert it very well but jquery.validation will acutely use the css class markup to apply validation rules. See the form controls that have the classes required, email, phoneUS, and zip. These are what trigger the validation logic. In essence this is the same to the following script tag but this little know markup is much cleaner.
Now you can see why the css markup trick is a lot cleaner. It also keeps the rules along with the fields they are affecting to it is easier to track down problems with the validation.
On another point you may notice that the first sample I posted is not validating the phone number and zip code properly. That is because I created custom class rules and methods that are not in the validation framework. The following class rule, think alias or marco, and method need to be added to the script tag after the validation include or more simply just added to a site wide script file. The first is a macro that applies multiple rules as a set. This also allows you to apply rules with parameters witch you can't do in the css markup. The second is an entirely new method that does some complex regular expression validation.
This approve can now be used to add as complex of validation logic as needed. The user will automatically see nice callouts when they try to submit the form with errors on it. Also of note this solution will fail gracefully so if there is a script error or javacscript is just unavailable the page will still function and post to the server. Now with that in mind it brings me to my final point. The receiving server side script should always to its own validation to catch not only these rare cases where javacript is disabled or some other error occurred, but also to catch cases there some user is intentionally trying to submit invalid data. And clint side validation like this can easily be disabled but the end user and a invalid form submitted. Thus the onus is always on the server code/database for true validation.
<script type='text/javascript' src='http://code.jquery.com/jquery-1.7.2.min.js'></script>
<script type='text/javascript' src='http://ajax.aspnetcdn.com/ajax/jquery.validate/1.9/jquery.validate.js'></script>
<script type='text/javascript'>
$(document).ready(function() {
 $("#myForm").validate();
}
</script>

<form action='?' method='post' id='myForm'>
 <p>
   <label for='firstName'>First Name:</label> <input name='firstName' id='firstName' class='required' type='text'>
 </p>
 <p>
   <label for='lastName'>Last Name:</label> <input name='lastName' id='lastName' class='required' type='text'>
 </p>
 <p>
  <label for="custType">Type:</label> <select name="custType" id="custType" class='required'>
   <option value=""></option>
   <option value="vendor">Vendor</option>
   <option value="salesrep">Sales Rep</option>
   <option value="supplier">Supplier</option>
   <select>
 </p>
 <p>
  <label for='emailAddress'>Email Address:</label> <input name='emailAddress' id='emailAddress' class='required email' type='text'>
 </p>
 <p>
  <label for='primaryPhone'>Phone Number:</label> <input name='primaryPhone' id='primaryPhone' class='required phoneUS' type='text'>
 </p>
 <p>
  <label for='zipCode'>Zip Code:</label> <input name='zipCode' id='zipCode' class='required zip' type='text'>
 </p>
 <p>
  <input type='submit' name='save' id='save' value='Save'>
 </p>
</form>
This might look quite impel but in reality is is doing nearly all the validation we need for this simple form. I am using the jQuery Validation plugin to do all the heavy lifting here. This is also a very elegant solution. You will notice that there is only one javascript call on the page yet all the fields are being validated. How you ask? While the documentation doesn't covert it very well but jquery.validation will acutely use the css class markup to apply validation rules. See the form controls that have the classes required, email, phoneUS, and zip. These are what trigger the validation logic. In essence this is the same to the following script tag but this little know markup is much cleaner.
$("#myForm").validate({
   rules: {
     firstName: "required",
     lastName: "required",
     custType: "required",
     emailAddress: {
       required: true,
       email: true
     },
     primaryPhone: {
       required: true,
       phoneUS: true
     },
     zipCode: {
       required: true,
       digits: true,
       minlength: 5,
       maxlength: 5
     }
   }
})
Now you can see why the css markup trick is a lot cleaner. It also keeps the rules along with the fields they are affecting to it is easier to track down problems with the validation.
On another point you may notice that the first sample I posted is not validating the phone number and zip code properly. That is because I created custom class rules and methods that are not in the validation framework. The following class rule, think alias or marco, and method need to be added to the script tag after the validation include or more simply just added to a site wide script file. The first is a macro that applies multiple rules as a set. This also allows you to apply rules with parameters witch you can't do in the css markup. The second is an entirely new method that does some complex regular expression validation.
jQuery.validator.addClassRules({
  zip: {
    digits: true,
    minlength: 5,
    maxlength: 5
  }
});

jQuery.validator.addMethod("phoneUS", function(phone_number, element) {
    phone_number = phone_number.replace(/\s+/g, "");
 return this.optional(element) || phone_number.length > 9 &&
  phone_number.match(/^(1-?)?(\([2-9]\d{2}\)|[2-9]\d{2})-?[2-9]\d{2}-?\d{4}$/);
}, "Please specify a valid phone number");
This approve can now be used to add as complex of validation logic as needed. The user will automatically see nice callouts when they try to submit the form with errors on it. Also of note this solution will fail gracefully so if there is a script error or javacscript is just unavailable the page will still function and post to the server. Now with that in mind it brings me to my final point. The receiving server side script should always to its own validation to catch not only these rare cases where javacript is disabled or some other error occurred, but also to catch cases there some user is intentionally trying to submit invalid data. And clint side validation like this can easily be disabled but the end user and a invalid form submitted. Thus the onus is always on the server code/database for true validation.
Friday, June 29, 2012
Show prompt/Run script when navigating away from a web page.
In the world of web browsers there are some real limitations to responding to user actions. Specifically when a user is viewing a web page they can navigate away from said page in a few different ways and it can be tricky to deal with and respond to these events. This is not a new topic but I have found the details online to be somewhat lacking.
A user can leave a page in many different ways. First of all they can simply click a web page link to another internal or external URL. This is the simplest action and it triggers a click event which can be responded to with a script and even canceled entirely. The following for example will show a message when the user click an external link(indicated by the presence of the class "external").
But how can we react to other types of navigation such as the browser back and forward buttons, page reload, url change, and page close events. This can be done to a limited extent with the onbeforeunload event though we can't actually see what action the user preformed to leave the page. There is a further problem here though. Simply adding a event handler on the onbeforeunload will also run when the user clicks links inside the site witch we may not want. With that in mind the following code will attach a event handler to the onbeforeunload but will discard it when it detects that a internal or external link was clicked witch can be captured normally. Additinal link level logic can then be added to the link click events.
This bit of code will allow for a script to run when the user tries to leave the page and can warn about unsaved changes, etc. Be warned though that this is only a prompt and furthermore that in most cases this type of alert/warning to users may be irritating. It should only be used to trigger warnings about unsaved changes, etc. Also there are some other limits here. For example you can't redirect the browser to a new url on page exit as the browser is already changing pages.
A user can leave a page in many different ways. First of all they can simply click a web page link to another internal or external URL. This is the simplest action and it triggers a click event which can be responded to with a script and even canceled entirely. The following for example will show a message when the user click an external link(indicated by the presence of the class "external").
$(document).ready(function()
  $("a.external").click(function() {
   alert("Leaving to " + $(this).attr("herf"));
 });
});
But how can we react to other types of navigation such as the browser back and forward buttons, page reload, url change, and page close events. This can be done to a limited extent with the onbeforeunload event though we can't actually see what action the user preformed to leave the page. There is a further problem here though. Simply adding a event handler on the onbeforeunload will also run when the user clicks links inside the site witch we may not want. With that in mind the following code will attach a event handler to the onbeforeunload but will discard it when it detects that a internal or external link was clicked witch can be captured normally. Additinal link level logic can then be added to the link click events.
$(document).ready(function() {
    // Listen for the unload event and return a warning/run custom code.
    window.onbeforeunload = function (event) {
      if(true) {
        return "You have items in your cart.";
      }
    }
   // If disable event on link clicks that are not hash links, mailto, or javascript calls.
    $("a[href]:not([href^=#],[href^=mailto],[href^=javascript])").click(function(){
      window.onbeforeunload = null;
    });
});
This bit of code will allow for a script to run when the user tries to leave the page and can warn about unsaved changes, etc. Be warned though that this is only a prompt and furthermore that in most cases this type of alert/warning to users may be irritating. It should only be used to trigger warnings about unsaved changes, etc. Also there are some other limits here. For example you can't redirect the browser to a new url on page exit as the browser is already changing pages.
Monday, December 12, 2011
Connecting OTRS into Active Directory.
I was testing out OTRS for work and got it to connect to and integrate with out Active Directory server. All the Customers and Agents are pulled in from AD, bassed on group membership, along with their contact information. This took quite a bit of trial and error but here is the config file I ended up with. Note that this isn't the full file but rather goes into the load method where indicated.
How to retain a users default printer in Citrix when using Session Printers.
Update: 2/27/2011
Rewrote the scripts as they didnt work is some situations and caused some very strange errors.
Aslo to remove some potential errors with client session printers a network printer shuold now be set in the policies though this will get changed by the scripts.
I just covered how to push down Session Printers in Citrix based on Active Directory membership in my last post. This method does however have one problem and that is that the users Default Printer preference will be discarded upon logout. To get around that the with some scripts can be set up in the users login script to restore the previous default printer. Also the free Defset utility will also need to be added as a published application for the users to use to change their default printer instead of the normal way.
You will need to download and save theDefSet utility onto each citrix server available form http://www.ctrl-alt-del.com.au/CAD_Utils.htm. In my case I just saved it to %windir%.
Once downloaded you will need to add a plublished application for the user to run this tool and set their default printer. It should use the following command line to execute.
Also save the following VBScript onto your Citrix servers where you put DefSet. The Adobe PDF printer is a default that will be used if no preference is set of if there is some error in the proccess though it can be changed here.
SetDefault.vbs
After that you will need to create a Group Policy that will apply to all the Citrix users. In this policy you will need to add the following login scripts.
SetPrinterDefault.bat
We also need to set a default printer in the policy so that client side printers not cause errors durring startup. Specificly what will happen is that if one of them gets assigned as a default durring the normal winodws logon proccess then the utilities will not work properly. To get around this we will set a server side default printer and then the login script will change it. This printer will need to be a session printer shared out to all the citrix users, though the default will just be changed so they won't really be printing to it. We just use our support printer but you could jsut as easily use a fake printer. Add the following Citrix Policy to the Group Policy we already created.
Please note that changing the default printer must be done with the DefSet tool and changing the printer in Windows will still be ignored on logoff.
Rewrote the scripts as they didnt work is some situations and caused some very strange errors.
Aslo to remove some potential errors with client session printers a network printer shuold now be set in the policies though this will get changed by the scripts.
I just covered how to push down Session Printers in Citrix based on Active Directory membership in my last post. This method does however have one problem and that is that the users Default Printer preference will be discarded upon logout. To get around that the with some scripts can be set up in the users login script to restore the previous default printer. Also the free Defset utility will also need to be added as a published application for the users to use to change their default printer instead of the normal way.
You will need to download and save theDefSet utility onto each citrix server available form http://www.ctrl-alt-del.com.au/CAD_Utils.htm. In my case I just saved it to %windir%.
Once downloaded you will need to add a plublished application for the user to run this tool and set their default printer. It should use the following command line to execute.
%windir%\defset.exe /PAAlso save the following VBScript onto your Citrix servers where you put DefSet. The Adobe PDF printer is a default that will be used if no preference is set of if there is some error in the proccess though it can be changed here.
SetDefault.vbs
On Error Resume Next
Err.Clear
Set WSHNetwork = CreateObject("WScript.Network")
Set ArgObj = WScript.Arguments
if ArgObj(0) = "Document" then
WSHNetwork.SetDefaultPrinter "Adobe PDF"
Else
WSHNetwork.SetDefaultPrinter ArgObj(0)
End if
if Err.Number <> 0 then
WSHNetwork.SetDefaultPrinter "Adobe PDF"
End if
After that you will need to create a Group Policy that will apply to all the Citrix users. In this policy you will need to add the following login scripts.
SetPrinterDefault.bat
rem @echo off
echo Waiting for network printers to appear.
timeout 15
echo Setting user default printer.
FOR /F "eol=; tokens=3 delims=\" %%i in (%userprofile%\Windows\defset.ini) do (
cscript.exe %windir%\SetPrinterDefault.vbs "%%i"
)
This will in essence work now but any client side printers published to the session will not save properly. To fix this add the following Citrix Policy to the Group Policy we already created.Policy: Client printer names
Value: Legacy printer namesWe also need to set a default printer in the policy so that client side printers not cause errors durring startup. Specificly what will happen is that if one of them gets assigned as a default durring the normal winodws logon proccess then the utilities will not work properly. To get around this we will set a server side default printer and then the login script will change it. This printer will need to be a session printer shared out to all the citrix users, though the default will just be changed so they won't really be printing to it. We just use our support printer but you could jsut as easily use a fake printer. Add the following Citrix Policy to the Group Policy we already created.
Policy: Default Printer
Value: \\PrintServer\GlobalSharedPrinter
Please note that changing the default printer must be done with the DefSet tool and changing the printer in Windows will still be ignored on logoff.
Granting users Session Printers bassed on Active Directory Membership with Citrix.
I have been setting up the new Citrix environment where I work on one of the biggest problems we have run into is that of printing. In the end I set the system up to use Citrix Group Policies to configure Session Printers at login time. Furthermore I have it configured to discard the printers at log off. The primary benefit to this approach is a one to one relationship between the printers a user has access to and the group membership in Active Directory. There is one group for each printer in AD those groups are granted to user/department groups as needed.
The Active Directory groups are named to match the printer names.
The Citrix Policies can be configured in the GPO or the Citrix Delivery Services Console as User Policies, one entry per printer. and look like so.
When the user logs in the Citrix policy is applied. It has one session printer line for each printer that is only applied if the user is a member of that printers security group. As a result when adding or removing printers in AD any changes will be reflected when the users log in again. This does not set or force down a default printer and any default set by the user will be lost on log out as the printers are discarded. Please see the next post for dealing with allowing users to set and store their default printer preference.
The Active Directory groups are named to match the printer names.
Printer - PNT001, Printer - PNT002-Color, Etc.The Citrix Policies can be configured in the GPO or the Citrix Delivery Services Console as User Policies, one entry per printer. and look like so.
Name: Printer - PNT001Setting: Session Printers \\print01\PNT001
Filter: Allow when user is in DOMIAN\Printer - PNT001 When the user logs in the Citrix policy is applied. It has one session printer line for each printer that is only applied if the user is a member of that printers security group. As a result when adding or removing printers in AD any changes will be reflected when the users log in again. This does not set or force down a default printer and any default set by the user will be lost on log out as the printers are discarded. Please see the next post for dealing with allowing users to set and store their default printer preference.
Friday, April 15, 2011
Reading .NET JSON Date's in jQuery
ASP.Net writes out date objects to a JSON stream in the format { "\/Date(x)\/" } but jQuery will not automatically convert this to a JavaScript date but rather keeps it as a string. To fix that this simple converter script can be included in your global JavaScript header.
Note that this does requite jQuery 1.5+.
Note that this does requite jQuery 1.5+.
$.ajaxSetup({
    // Add a custom converter to convert ASP.NET JSON dates to JS Date object
    // That is convert { "\/Date(...)\/" } to { new Date(...) }
    converters: {
        "text json": function( textValue ) {
            return jQuery.parseJSON(textValue.replace(/"\\\/Date\((-?\d*)\)\\\/"/g, "new Date($1)"));
        }
    }
});
Thursday, August 12, 2010
Mass rename files in Midnight Commander
Here is another script for Midnight Commander to allow for mass renaming of flagged files. To use it you will need to add it to your MC menu file in /etc/mc/mc.menu or ~/.mc/menu.
first you will need to flag the files toy want to rename then execute the user operation. When you do so you will be prompted for the regular expression you with to execute.
Some examples:
+ t t
e       Rename tagged files
        set %t; CMD=%{Enter regex}
        while [ -n "$1" ]; do
          echo rename -\"s"$CMD"e\" "$1"
          rename -\"s"$CMD"e\" "$1"
          shift
        done
first you will need to flag the files toy want to rename then execute the user operation. When you do so you will be prompted for the regular expression you with to execute.
Some examples:
 /oldword/newword/   # Change a word.
 /_/ /g   # Replace all _'s with spaces.
 /_\[.*\]//   # Remove _[CRCHASH] tags.
 /\(.*\)//   # Remove (...) sections.
Comapring files with md5 Checksums in Midnight Commander
I wrote a few scripts for Midnight Commander to easily compare multiple copies of a directory via checksums. There are a few variations listed below along with a bash script that does the same thing.
First off is this simple bash script that can be used stand alone but is also required for the MC menu entries.
/usr/local/bin/md5compare
You may need to tweak the bash and script paths for your installation. Also remember to make it executable.
To execute this command directly just run the following.
Next up are two comparison scripts that can be added MC's user menu. To do this append them to the mc.menu file in your system /etc or users ~/.mc/menu.
This script will compare the currently highlighted file with one of the same name in the other panel.
This script on the other hand will compare all tagged files to any matching files in the other panel.
Finally here is a menu item to simply dispaly the checksum of the selected file.
First off is this simple bash script that can be used stand alone but is also required for the MC menu entries.
/usr/local/bin/md5compare
#!/usr/local/bin/bash
echo -n "Comparing $1 to $2: "
if [ ! -e "$1" ] || [ ! -e "$2" ]
then
 echo File Missing
 exit 1;
fi

if [ $(md5 -q "$1") = $(md5 -q "$2") ]
then
 echo Files Match
 exit 0;
else
 echo Files Different
 exit 1;
fi
You may need to tweak the bash and script paths for your installation. Also remember to make it executable.
sudo chmod +x /usr/local/bin/md5compare
To execute this command directly just run the following.
md5compare file1 file2
Next up are two comparison scripts that can be added MC's user menu. To do this append them to the mc.menu file in your system /etc or users ~/.mc/menu.
This script will compare the currently highlighted file with one of the same name in the other panel.
+ t n
w       Compare files via MD5 checksum
        /usr/local/bin/md5compare %f %D/%f
        echo Press any key to continue
        read key
This script on the other hand will compare all tagged files to any matching files in the other panel.
+ t t
W       Compare tagged files via MD5 checksum
        for i in %t
        do
          /usr/local/bin/md5compare "$i" %D/"$i"
        done
        echo Press any key to continue
        read key
Finally here is a menu item to simply dispaly the checksum of the selected file.
+ t n
s       Calculate MD5 checksum
        echo Calculating checksum of %f
        md5 -q %f
        echo Press any key to continue
        read key
Wednesday, April 21, 2010
Extra BoardGameGeek Record a Play links.
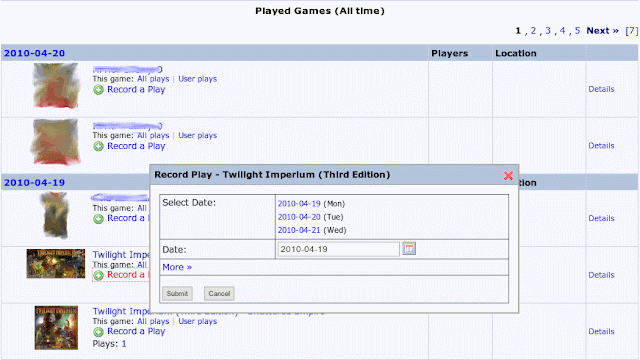
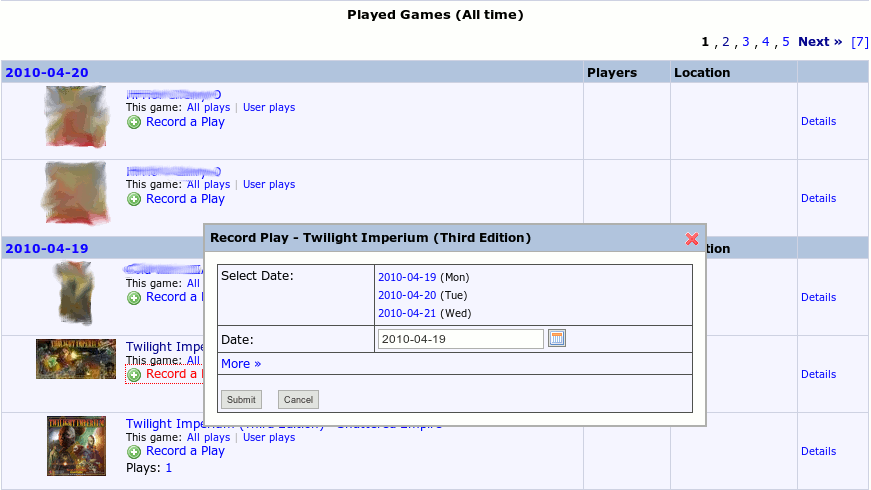
This is a simple Greasemonkey script that adds "Record a Play" links to the played games lists. This is useful when browsing your friends Recent Plays list as it allows you to directly add a play from the page without having to first open the game. It also sets the play date to that of the original item so if you both played the same game its a simple two click to copy their play to your own account.
A picture is worth a thousand words:
Installation Instructions:
Install the Greasemonkey plug-in for your web browser. Or use this version for Safari(Click NinjaKit for Safari.)
Restart your web browser as necessary.
Install the Greased MooTools and Extra Log Plays Links scripts into Greasemonkey.
A picture is worth a thousand words:
Installation Instructions:
Install the Greasemonkey plug-in for your web browser. Or use this version for Safari(Click NinjaKit for Safari.)
Restart your web browser as necessary.
Install the Greased MooTools and Extra Log Plays Links scripts into Greasemonkey.
Friday, April 16, 2010
Backup your FreeBSD system configuration.
I set up a simple script to create a configuration backups of my FreeBSD box and I thought I would share it. Note that this script will only back up the /etc and /usr/local/etc directories and weighs in at just under 1MB per backup.
First create a backup script as we can't execute our complex command directly in cron. You may want to customize the exclude options to your licking, the two listed exclusions are the rather large gconf defaults, witch is not needed, and the working files for transmission.
Now make it executable.
Now add the job to cron and set it to run weekly as root.
First create a backup script as we can't execute our complex command directly in cron. You may want to customize the exclude options to your licking, the two listed exclusions are the rather large gconf defaults, witch is not needed, and the working files for transmission.
sudo vim /usr/local/sbin/backup-config
bash -c 'tar -czf /root/freebsd-cfg-`date "+%Y-%m-%d"`.tgz --exclude={etc/gconf,usr/local/etc/transmission/home/{resume,torrents,Downloads,blocklists}} /etc/ /usr/local/etc/'
Now make it executable.
chmod +x /usr/local/sbin/backup-config
Now add the job to cron and set it to run weekly as root.
sudo vim /etc/crontab# Backup the entire server configuration once a week.
0 1 * * 0 root backup-config 2>/dev/null
Thursday, March 25, 2010
Mixing binary backage and source ports install sources with portupgrade in FreeBSD
Ok so a few weeks ago I made this post about automating update checks and downloads. While as it turns out there was another issue I ran into. The problem is simply this:
When using portupgrade -Pa to to FreeBSD updates from packages all updated packages will be installed even if you compile one of the updated packages was compiled locally from the ports tree with custom options or libraries. This causes any customizations to be lost and possibly version mismatches with system libraries.
The only ways around this problem was to either only upgrade some subset of the ports or to set HOLD_PKGS and manually update problem ports after a package update. Neither of these solutions is optimal so I took the time to make a patch for portupgrade.
The patch adds a USE_PORTS configuration option that specifies a lit of packages to always build from the ports tree even when portupgrade -P is called. (The -PP option still works the same as before.) Thus any custom packages can be added to this list and then an automatic update can be done that will favor binary version when available and when not overridden. This also means that if one package is built from source its parents and children will still come from binary packages if available.
Build the pached version
Patch, build, and install.
Configuration
To configure the list of overrides you will need to edit the following section:
When using portupgrade -Pa to to FreeBSD updates from packages all updated packages will be installed even if you compile one of the updated packages was compiled locally from the ports tree with custom options or libraries. This causes any customizations to be lost and possibly version mismatches with system libraries.
The only ways around this problem was to either only upgrade some subset of the ports or to set HOLD_PKGS and manually update problem ports after a package update. Neither of these solutions is optimal so I took the time to make a patch for portupgrade.
The patch adds a USE_PORTS configuration option that specifies a lit of packages to always build from the ports tree even when portupgrade -P is called. (The -PP option still works the same as before.) Thus any custom packages can be added to this list and then an automatic update can be done that will favor binary version when available and when not overridden. This also means that if one package is built from source its parents and children will still come from binary packages if available.
Build the pached version
Patch, build, and install.
cd /usr/ports/ports-mgmt/portupgrade
sudo make extract
cd work
sudo wget http://pynej.dnsalias.com/Shared/pkgtools-2.4.6-1.patch
sudo patch -p0 < pkgtools-2.4.6-1.patch
cd pkgtools-2.4.6
sudo make isntall clean
You may also want to add portupgrade to your HOLD_PKGS list in /usr/local/etc/pkgtools.conf so it doesn't get replaced in the future.
Configuration
To configure the list of overrides you will need to edit the following section:
sudo vim /usr/local/etc/pkgtools.conf
USE_PORTS = [

  ]
Here is a sample of some common overrides.- php5 to enable the apache module
- php5-mysql to get the binding to the correct version of mysql-server
- mod_perl2 to enable apache module
- phpmyadmin as it depends ont he wrong php5-mysql paskage)
sudo vim /usr/local/etc/pkgtools.conf
USE_PORTS = [
    'lang/php5',
    'databases/php5-mysql',
    'databases/phpmyadmin',
    'www/mod_perl2',
  ]
Friday, March 12, 2010
Configure VirtualBox Deamon
A while back I switched from VMware to VirtualBox(when switching to freebsd) and ran into a problem getting virtual machines to start on server boot. Virtual box supports background operation(headless mode) but freebsd does not come with and rc service for doing so. Included below is a freebsd version to accomplish startup/shutdown task as well as other common operations.
To install save this script into /usr/local/etc/rc.d/virtualbox and make it executable. Then add the following lines to your /etc/rc.conf as needed.
A few other notes: I actually set up a separate account for VirtualBox and the daemon supports this. Also please note that the autostart list is done by name and the names can not have spaces. You can also manually start and stop machines with the startvm and stopvm options.
To install save this script into /usr/local/etc/rc.d/virtualbox and make it executable. Then add the following lines to your /etc/rc.conf as needed.
# Load the VirtualBox drivers and start any default machines.
vboxnet_enable="YES" # Enable drivers from package virtualbox-ose-kmod.
virtualbox_enable="YES"
virtualbox_autostart="ASG" # List of machine names to start on boot.
virtualbox_user="vboxuser"
virtualbox_group="vboxusers"
A few other notes: I actually set up a separate account for VirtualBox and the daemon supports this. Also please note that the autostart list is done by name and the names can not have spaces. You can also manually start and stop machines with the startvm and stopvm options.
/usr/local/etc/rc.d/virtualbox
#!/bin/sh
#

# PROVIDE: virtualbox
# REQUIRE: LOGIN vboxnet

#
# Add the following lines to /etc/rc.conf to enable the virtualbox daemon:
#
# virtualbox_enable="YES"
# virtualbox_autostart="BOX1 BOX2"
#


. /etc/rc.subr

name="virtualbox"
rcvar=`set_rcvar`
extra_commands="status startvm stopvm"

start_cmd="${name}_start"
stop_cmd="${name}_start"
status_cmd="${name}_status"
startvm_cmd="${name}_startvm"
stopvm_cmd="${name}_stopvm"
poweroffvm_cmd="${name}_poweroffvm"

load_rc_config $name

virtualbox_user=${virtualbox_user:-"vboxuser"}
virtualbox_group=${virtualbox_group:-"vboxusers"}
virtualbox_autostart=${virtualbox_autostart:-""}

SU="su $virtualbox_user -c"
VBOXMANAGE="/usr/local/bin/VBoxManage -nologo"

virtualbox_start()
{
        echo "Starting ${name}."

        echo $virtualbox_autostart | awk -F , '{for(i=1;i<=NF;i++) print $i}' |  while read VM; do
            $SU "$VBOXMANAGE startvm \"$VM\" --type headless"
        done
}

virtualbox_stop()
{
        echo "Stopping ${name}."
        $SU "$VBOXMANAGE list runningvms" | sed 's/.*"\(.*\)".*/\1/' | while read VM; do
            $SU "$VBOXMANAGE controlvm \"$VM\" acpipowerbutton"
        done

        wait_for_closing_machines
}

virtualbox_startvm()
{
        $SU "$VBOXMANAGE startvm \"$*\" --type headless"
}

virtualbox_stopvm()
{
        $SU "$VBOXMANAGE controlvm \"$*\" acpipowerbutton"
}

virtualbox_poweroffvm()
{
        $SU "$VBOXMANAGE controlvm \"$*\" poweroff"
}

virtualbox_status()
{

        $SU "$VBOXMANAGE list runningvms" | sed 's/.*"\(.*\)".*/\1/' | while read VM; do
            echo "$VM "
        done
}

wait_for_closing_machines() {
    RUNNING_MACHINES=`$SU "$VBOXMANAGE list runningvms" | wc -l`
    if [ $RUNNING_MACHINES != 0 ]; then
        sleep 5
        wait_for_closing_machines
    fi
}

run_rc_command "$@"
Friday, March 5, 2010
Setting up FreeBSD to Auto-Download and Notify Updates
03/11/2010- Update: Updated the portsnap command to properly apply the port updates. As configured before the changes would show up but the cron task to download packages would never download them.
Overview
The default install of FreeBSD is very stable, and works well. And it is relatively simple manually do updates, but I recent looked into setting up auto-updates like Ubuntu does. The way I have it et up now is the following.
Automatic downloading of kernel/world updates to the FreeBSD release.
Automatic downloading and updating of the current ports tree.
Automatic downloading of any updated binary packages of installed ports.
These three tasks are set as cron jobs and run once a day/week to check for and download updates. Reports are also sent to the root account on checking so you will be notified where updates are available. The administrator can then manuals install the system updates, binary packages updates, and source port updates from the local cache.
Setup
First off we will add a few cron jobs to auto-download our updates. Add these lines to /etc/cron and customize the run time as desired.
To enable the email reports you need to add an alias to send mail to forward root's mail to an administrator. To do so edit the file /etc/aliases and add line like so with your username.
You will also need to install the portutils package if you don't have it for package updating.
Once installed we need to change the package source location to pull binary package updates from the stable branch instead of the release branch. The release packages are never updated and as such we would never find binary updates. To change this edit the /usr/local/etc/pkgtools.conf file and change the PKG_SITES variable to the following.
Unfortunately the portupgrade utility does not respect packages you customized and build by hand and will just overwrite them with the binary version. To get around this you can add any exceptions you want to HOLD_PKGS array in this file and update them manually. You way also want to add any languages you don't use to the IGNORE_CATEGORIES array at this time as well to speed up the ports commands.
Manual Update
Once all these steps are done we can force a manual update of all three with the following commands, though they will take a bit to complete.
Installing Updates
If using ZFS you may want to make a snapshot first.
When you want to do an actual update to the system here are the commands to install the downloaded updates.
And finally its a good idea to clean out the old files manually or via another cron task..
If everything went smoothly you may wish to remove the old snapshots.
Overview
The default install of FreeBSD is very stable, and works well. And it is relatively simple manually do updates, but I recent looked into setting up auto-updates like Ubuntu does. The way I have it et up now is the following.
Automatic downloading of kernel/world updates to the FreeBSD release.
Automatic downloading and updating of the current ports tree.
Automatic downloading of any updated binary packages of installed ports.
These three tasks are set as cron jobs and run once a day/week to check for and download updates. Reports are also sent to the root account on checking so you will be notified where updates are available. The administrator can then manuals install the system updates, binary packages updates, and source port updates from the local cache.
Setup
First off we will add a few cron jobs to auto-download our updates. Add these lines to /etc/cron and customize the run time as desired.
# Check for freebsd updates, download them, and mail root.
0       2       *       *       0       root    freebsd-update cron
# Check for ports updates, download them, and mail root.
0       3       *       *       0       root    portsnap cron update && pkg_version -vIL=
# Check for binary pacakge updates, download them, and mail root.
0       4       *       *       0       root    portupgrade -PFa
To enable the email reports you need to add an alias to send mail to forward root's mail to an administrator. To do so edit the file /etc/aliases and add line like so with your username.
root: adminaccountThen run the following command to make the change take effect.
cd /etc/mail && sudo make aliases
You will also need to install the portutils package if you don't have it for package updating.
cd /usr/ports/ports-mgmt/portupgrade && sudo make install
Once installed we need to change the package source location to pull binary package updates from the stable branch instead of the release branch. The release packages are never updated and as such we would never find binary updates. To change this edit the /usr/local/etc/pkgtools.conf file and change the PKG_SITES variable to the following.
PKG_SITES = [
    sprintf('ftp://ftp.freebsd.org/pub/FreeBSD/ports/%s/packages-%s-stable/', OS_PLATFORM, OS_MAJOR)
  ]
Unfortunately the portupgrade utility does not respect packages you customized and build by hand and will just overwrite them with the binary version. To get around this you can add any exceptions you want to HOLD_PKGS array in this file and update them manually. You way also want to add any languages you don't use to the IGNORE_CATEGORIES array at this time as well to speed up the ports commands.
Manual Update
Once all these steps are done we can force a manual update of all three with the following commands, though they will take a bit to complete.
sudo freebsd-update fetch
sudo portsnap fetch update
sudo portupgrade -PFa
Installing Updates
If using ZFS you may want to make a snapshot first.
sudo zfs snapshot zroot@ver-date
sudo zfs snapshot zroot/usr@ver-date
When you want to do an actual update to the system here are the commands to install the downloaded updates.
sudo freebsd-update install
sudo portupgrade -Pa
And finally its a good idea to clean out the old files manually or via another cron task..
portsclean -CDPL
If everything went smoothly you may wish to remove the old snapshots.
sudo zfs destroy zroot@ver-date
sudo zfs destroy zroot/usr@ver-date
Subscribe to:
Posts (Atom)
Project Licenses

These works by Jeremy Pyne are licensed under a Creative Commons Attribution-Noncommercial-Share Alike 3.0 Unported License