Thursday, August 12, 2010

Mass rename files in Midnight Commander

Here is another script for Midnight Commander to allow for mass renaming of flagged files. To use it you will need to add it to your MC menu file in /etc/mc/mc.menu or ~/.mc/menu.

+ t t
e       Rename tagged files
        set %t; CMD=%{Enter regex}
        while [ -n "$1" ]; do
          echo rename -\"s"$CMD"e\" "$1"
          rename -\"s"$CMD"e\" "$1"
          shift
        done

first you will need to flag the files toy want to rename then execute the user operation. When you do so you will be prompted for the regular expression you with to execute.

Some examples:
 /oldword/newword/   # Change a word.
 /_/ /g   # Replace all _'s with spaces.
 /_\[.*\]//   # Remove _[CRCHASH] tags.
 /\(.*\)//   # Remove (...) sections.

Comapring files with md5 Checksums in Midnight Commander

I wrote a few scripts for Midnight Commander to easily compare multiple copies of a directory via checksums.  There are a few variations listed below along with a bash script that does the same thing.


First off is this simple bash script that can be used stand alone but is also required for the MC menu entries. 

/usr/local/bin/md5compare
#!/usr/local/bin/bash
echo -n "Comparing $1 to $2: "
if [ ! -e "$1" ] || [ ! -e "$2" ]
then
 echo File Missing
 exit 1; 
fi

if [ $(md5 -q "$1") = $(md5 -q "$2") ]
then
 echo Files Match
 exit 0;
else
 echo Files Different
 exit 1;
fi

You may need to tweak the bash and script paths for your installation. Also remember to make it executable.

sudo chmod +x /usr/local/bin/md5compare

To execute this command directly just run the following.

md5compare file1 file2


Next up are two comparison scripts that can be added MC's user menu.  To do this append them to the mc.menu file in your system /etc or users ~/.mc/menu.

This script will compare the currently highlighted file with one of the same name in the other panel.

+ t n
w       Compare files via MD5 checksum
        /usr/local/bin/md5compare %f %D/%f
        echo Press any key to continue
        read key

This script on the other hand will compare all tagged files to any matching files in the other panel.

+ t t
W       Compare tagged files via MD5 checksum
        for i in %t
        do 
          /usr/local/bin/md5compare "$i" %D/"$i"
        done
        echo Press any key to continue
        read key

Finally here is a menu item to simply dispaly the checksum of the selected file.

+ t n
s       Calculate MD5 checksum
        echo Calculating checksum of %f
        md5 -q %f
        echo Press any key to continue
        read key

Monday, June 28, 2010

Tracking Customer Companies in OTRS.

I have been playing abound with OTRS for the past few days and ran into a bit of a snag.  I installed it from the Ubuntu repositories but noticed that the Customers can't be linked to the Companies witch would be a useful feature.  I also found out after some digging that there was no option in the SysConfig to fix this.  I found the setting by manually editing the config files but this was of limited use.  In the end I had to make a few manual edits to make the system work as expected.  I outlined the changes below to the base 2.4.7 install.

First open a terminal and cd to your otrs install directory.
cd /usr/share/otrs

Enable CustomerCompanySupport
sudo vim Kernel/Config.pm
Add the following line inside the sub Load method.
# Enable Customer Company linking.
$Self->{CustomerUser}->{CustomerCompanySupport} = 1;

Run the mysql client and add a field to the customer table.
mysql -u root -p
use otrs2;
alter table customer_user add column company_id varchar(100);
exit

Register the extra row with the editor.
sudo vim Kernel/Config/Defaults.pm
Find the CustomerUser variable and then the Map array within it.  Add the following line after the UserCustomerID field.
[ 'UserCompanyID',  'CompanyID',  'company_id',  0, 1, 'var', '', 0 ],

Change the company dropdown list to trigger on the new CompanyID field.
sudo vim Kernel/Modules/AdminCustomerUser.pm
Look for the reference to UserCustomerID and change it to UseCompanyID. It should look like this now.
$Entry->[0] =~ /^UserCompanyID$/i

Change the dispaly logic to match against the new CompanyID.
sudo vim Kernel/System/CustomerUser.pm
Look for the reference to UserCustomerID and change it to UseCompanyID. It should look like this now.
CustomerID => $Customer{UserCompanyID},

You can now restart apache and the changes should show up.
sudo /etc/init.d/apache2 restart

Thursday, May 6, 2010

Adobe Photoshop CS5 Content Aware Fill

I posted an article previously about the Resynthesizer plugin for GIMP.  I took the same pictures as before and did the same edits this time with the CS5 Content Aware Fill and here are the results.  Again I will point out that these pictures are doing a "Single Pass" without doing any manual edits or touchups and are just a test of the Content-Aware logic.


IMG_1065
IMG_1069

Wednesday, April 21, 2010

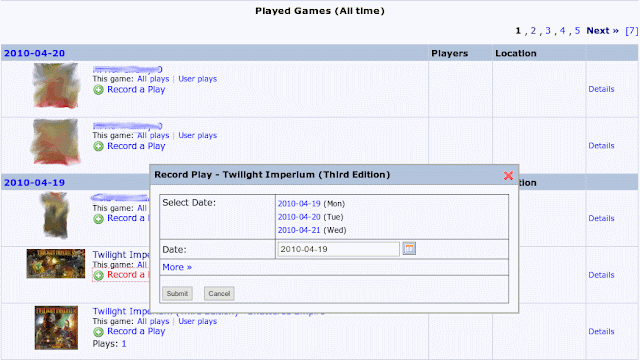
Extra BoardGameGeek Record a Play links.

This is a simple Greasemonkey script that adds "Record a Play" links to the played games lists. This is useful when browsing your friends Recent Plays list as it allows you to directly add a play from the page without having to first open the game. It also sets the play date to that of the original item so if you both played the same game its a simple two click to copy their play to your own account.

A picture is worth a thousand words:

Installation Instructions:
Install the Greasemonkey plug-in for your web browser. Or use this version for Safari(Click NinjaKit for Safari.)
Restart your web browser as necessary.
Install the Greased MooTools and Extra Log Plays Links scripts into Greasemonkey.

Friday, April 16, 2010

PHP MySQL database abstraction class

I wrote a very elegant database interaction class for PHP some time ago.  The class is a simple layer between a PHP application and its database and provides a very clean and efficient interface to the database.  It does not generate the SQL code for you, but rather it makes a cleaner method of calling your SQL code.  It allows you to generate repeatable queries as objects, provides parameter substitution in queries, and allows reading a record via class accessors.  Some samples of these features are shown below.

I have not posted the source code itself as I feel this is one of my more exquisite projects and I don't want to see it taken without credit.  I may be willing to provide the code on request though.


Examples: A simple reader query. (Select)
$users = new query("SELECT userID, username, lastAccess, enabled FROM users;");

if(!$users->is_valid())
   return false;

while($users->fetch())
{
    echo $users->usersID;
}


A simple non-reader query. (Insert, Update, Delete)
if(!query::run("UPDATE users SET session = '$userSessionID', lastAccess = NOW() WHERE userID = $userID;"))
    throw new Exception("Database update failed.");


The same update only using parameters instead of string substitution. There are two ways to do this and both generate identical SQL code.
return query::run("UPDATE users SET session = @1, lastAccess = NOW() WHERE userID = @2;", $userSessionID, $userID);

return query::run("UPDATE users SET session = @sessionID, lastAccess = NOW() WHERE userID = @usersID;",
   array(sessionID => $userSessionID, usersID => $userID));


All three of the above update calls will generate the following statement. Notice how the second two statements automatically quote string and escape any special characters in strings.

UPDATE users SET session = 'SESSION', lastAccess = NOW() WHERE userID = UID;


You can also use parameters in reader queries exactly the same way as above. Also you can prepare the query and then set parameters/execute the query as a seperate step. Again the folloing are identical.
$users = new query("SELECT userID, username, lastAccess, enabled FROM users WHERE username = @username;", false);
$users->username = $username;
$users->execute();

$users = new query("SELECT userID, username, lastAccess, enabled FROM users WHERE username = @1;", false);
$users->execute(true, $username);

$users = new query("SELECT userID, username, lastAccess, enabled FROM users WHERE username = @username;", false);
$users->execute(true, array(username => $username);


To read the results there are a few other options as well.
$users = new query("SELECT userID, username, lastAccess FROM users WHERE username = @username;", false);

foreach($users as $user) {
    $users->username = $user;

    if(!$users->execute())
        continus;

    echo $users->usersID; // Get a coulmn value.
    print_r($users->get_row()); // Print the entire row.
    echo $users->get_md5(); // Time dependent hash.
    echo $users->get_md5('userID', 'username'); // UserID/Username dependent hash.
    echo $users->get_columns(); // Get a list of loaded columns.
}


Also there are a few other calls that may be useful. You can get the number or records and raw SQL statement like so.
$users = new query("SELECT userID, username, lastAccess, enabled FROM users;");
echo $users->get_length();
echo $users->get_last_sql();

query::run("UPDATE users SET groupName = @1, lastEdit = NOW() WHERE groupName = @2;", $newGroupName, $groupName);
echo query::length();
echo query::last_sql();
Backup your FreeBSD system configuration.

I set up a simple script to create a configuration backups of my FreeBSD box and I thought I would share it. Note that this script will only back up the /etc and /usr/local/etc directories and weighs in at just under 1MB per backup.

First create a backup script as we can't execute our complex command directly in cron.  You may want to customize the exclude options to your licking, the two listed exclusions are the rather large gconf defaults, witch is not needed, and the working files for transmission.
sudo vim /usr/local/sbin/backup-config
bash -c 'tar -czf /root/freebsd-cfg-`date "+%Y-%m-%d"`.tgz --exclude={etc/gconf,usr/local/etc/transmission/home/{resume,torrents,Downloads,blocklists}} /etc/ /usr/local/etc/'

Now make it executable.
chmod +x /usr/local/sbin/backup-config

Now add the job to cron and set it to run weekly as root.
sudo vim /etc/crontab# Backup the entire server configuration once a week.
0 1 * * 0 root backup-config 2>/dev/null

Thursday, April 15, 2010

Patch for VIrtualbox not working on Freebsd after updating graphics/png port.

I have had a very frustrating time over the last few days.  After doing a full portupgrade I found that virtualbox-ose would no longer work properly.  The GUI portion was working and I could run vm's but I was unable to manage any machines from the console with VBoxManage.  Trying to do any operations would just die with the following error.

ERROR: failed to create a session object!
ERROR: code NS_ERROR_FACTORY_NOT_REGISTERED (0x80040154) - Class not
registered (extended info not available)
Most likely, the VirtualBox COM server is not running or failed to start.

The only changes where Virtualbox being bumped from 3.1.4 to 3.1.6 and a new version of the dependent graphics/png package.  After much testing I determined that the problem was with the png update change but I couldn't figure out how to resolve it.  I finally found a patch out and about that fixed this problem so I am posting more details here.  The patch listed in that page is actually not a patch at all but rather a replacement makefile so i created a patch and posted instructions below.

Build the pached version
Patch, build, and install.

cd /usr/ports/emulators/virtualbox-ose
sudo wget http://pynej.dnsalias.com/Shared/virtualbox-ose-3.1.6_2-1.patch
sudo patch -p0 < virtualbox-ose-3.1.6_2-1.patch
sudo portupgrade -f virtualbox-ose

Thursday, April 8, 2010

Updatting c# applicationSettings in a ASP.NET Web Application

I have a few .NET web applications, using MVC, that make use of applicationSettings in their configuration.  These settings are semi-constant but do need to be updated from time to time.  I was trying to make an edit screen in the web application for developers so they could edit the applicationSettings without having to get on the server and manually edit the Web.config file.  As expected the applicationSettings are read only when accesses directly in the application and can not be updated.  Also it's not possible to configure the settings as userSettings when running as a web application.   Though we could do this by manualy reading and writing the file I was looking for a simpler way to do it.

After some tinkering I found a fairly simple way of doing this.  Basically we can use a custom ConfigurationManager instance to read the Web.config independently of the application and update this instance of the configuration.  Then we just call the save method and the edited data is saved out.  Here is the code for a simple update call.

Note that this code is tailored for MVC and is looping tough the FormCollection values. You could also explicitly read the post variables as parameters of the post action, or use this outside of MVC entirely. Just keep in mind that however you do it you can't loop by clientSection.Settings as the requirement to remove/re-add each updated value prevents this.


using System.Configuration;

[AcceptVerbs(HttpVerbs.Post), Authorize(Roles = "Admin")]
public ActionResult SaveSettings(FormCollection collection)
{
/* This section of code uses a custom configuration manager to edit the Web.config application settings.
 * These settings are normally read only but web apps don't support user scoped settings.
 * This set of variables is used for system features, not runtime tracking so it it only updated when an 
 *  administrator logs in to reconfigure the system.
 * 
 * Author: Jeremy Pyne 
 * Licence: CC:BY/NC/SA  http://creativecommons.org/licenses/by-nc-sa/3.0/
 */

// Load the Web.config file for editing.  A custom mapping to the file is needed as the default to to match the application's exe filename witch we don't have.
System.Configuration.Configuration config = ConfigurationManager.OpenMappedExeConfiguration(new ExeConfigurationFileMap() {ExeConfigFilename = HttpContext.Server.MapPath("..\\Web.config") }, ConfigurationUserLevel.None);

// Find the applicationSettings group.
ConfigurationSectionGroup group = config.SectionGroups["applicationSettings"];
if (group == null)
    throw new AjaxException("Could not find application settings.");

// Find this applications section. Note: APP needs to be replaced with the namespace of your project.
ClientSettingsSection clientSection = group.Sections["APP.Properties.Settings"] as ClientSettingsSection;
if (clientSection == null)
        throw new AjaxException("Could not find Hines settings.");

// Loop through each value we are trying to update.
foreach (string key in collection.AllKeys)
{
    // Look for a setting in the config that has the same name as the current variable.
    SettingElement settingElement = clientSection.Settings.Get(key);

    // Only update values that are present in the config file.
    if (settingElement != null)
    {
        string value = collection[key];

        // Is this is an xml value then we need to do some conversion instead.  This currently only supports the StringCollection class.
        if (settingElement.SerializeAs == SettingsSerializeAs.Xml)
        {
            // Convert the form post (bob,apple,sam) to a StringCollection object.
            System.Collections.Specialized.StringCollection sc = new System.Collections.Specialized.StringCollection();
            sc.AddRange(value.Split(new char[] { ',' }));

            // Make an XML Serilization of the new StringCollection
            System.Xml.Serialization.XmlSerializer ser = new System.Xml.Serialization.XmlSerializer(typeof(System.Collections.Specialized.StringCollection));
            System.IO.StringWriter writer = new System.IO.StringWriter();
            ser.Serialize(writer, sc);

            // Get the xml code and trim the xml definition line from the top.
            value = writer.ToString().Replace("<?xml version=\"1.0\" encoding=\"utf-16\"?>", "");
        }

        // This is a custom override for MVC checkboxes.  They post as 'false' when unchecked and 'true,false' when selected.
        if(value == "true,false")
            value = "True";
        if(value == "false")
            value = "False";

        // Replace the settings with a updated settings.  It is necessary to do it this way instead of 
        //  updating it in place so that the configuration manager recognize that the setting has changed.
        // Also we can't just look through clientSection.Settings and update that way because then we wouldn't
        //  to do this exact thing.
        clientSection.Settings.Remove(settingElement);
        settingElement.Value.ValueXml.InnerXml = value;
        clientSection.Settings.Add(settingElement);
    }
}

// Save any changes to the configuration file.  Don't set forceSaveAll or other parts of the Web.config will get overwritten and break.
config.Save(ConfigurationSaveMode.Full);
}

Tuesday, April 6, 2010

Multiple Google Calenders on the iPad

Ok, I was a bit frustrated after setting up the Google Sync to find that I could only sync one calender even though the iPhone supports multiple.  I'm sure this will be fixed in short order by Google but until then here is how you can fix it on your desktop using Firefox.  You may also be able to do this in Safari as shown here but I haven't tested that.

  • First set up Google Sync as an Exchange account.
  • Then on you desktop install the User Agent Switcher extensions.
  • Restart Firefox and then go to Tools->Default User Agent->iPhone 3.0 to change your agent.
  • Now navigate to http://m.google.com/sync and select the iPad entry.
  • The new screen with list your calenders but the JavaScript code still prevents you from selecting multiple.  To get around this just go into the browser preferences and un-check Enable JavaScript under the Content tab. 
  • Now you can select all the calenders you want and save the changes. 

To revert the changes to your browser first recheck the Enable JavaScript option and then change the User Agent back to Default User Agent.

You can also just disable scripts temporarily on google.com with the NoScript plugin if you use it instead switching JavaScript on and off.

Monday, April 5, 2010

My thoughts on the iPad.

So I went to the apple store one Saturday to take a look at the new iPad's.  I hadn't pre-ordered one and wasn't sure if I would end up getting one rig away or wait for a newer model/price drop.  After playing with one for a bit and asking some questions I ended up buying the 16GB model with no accessories. What follows are my impressions of the device, mu thoughts on some of the criticisms, and some things I hope to see in the future.

First off let me say hat I run OSX at home and have an first generation iPhone as well.  I like apple products for their reliability and usability.  I don't have a laptop so I was looking for a portable device that I could use at home and on the go for web surfing and personal uses. I get by with my phone for that now but it is rather slow when it comes to web browsing And the smaller screen limits some of it's usefulness. This is where I am coming from and what I was hoping to find with the iPad.  I found the iPad to be very responsive and the larger display to be stunning.  The Apple applications are top notch as one would expect though the third party apps are somewhat limited of of yet.  It is obvious that some developers have grasped the new user interface that Apple has created and some have not.

As for some of the criticisms of the device, first off. It is not a laptop, it's not a net book, stop with the "you could get a laptop for cheaper".  Net book is cheaper yes, but a sub $500 net book is going to have a tiny screen, limited system resources, and run Windows. This type of device is in my mind a lot more hassle and a lot less useful then the iPad and iPhone OS. Furthermore if I were to get a full laptop it would be attest $1200 for a nice MacBook. Again I tend to avoid Windows and a $500-800 Windows laptop isn't going to have the same lifetime as my tablet. As for the lack of a camera, you wouldn't want to use this to take pictures and video conferencing would be nifty but not realistic. The iPad is much more useful as a tool during communications then a provider of it. I'm sure it is a feature they will add but Its just not a must have.  As far as background processing goes, put it to bed already. So the iPhone OS doesn't allow background processing. I'd rather have a stable and secure device then find out half way through the day my batter is dead because I left so e stupid app running in the background. The push notification system provide a lot of the user interaction with minimal power consumption.  The only service that I have found that would really benefit from background processing is instant messaging.

As far as my hopes for the future there are a few things in the works that I expect in the 4.0 release and some third party apps I hope to see. Background processing for one is currently in testing for the 4.0 release. I would also like to see build in support for printing to network printers instead of needing third party apps.  Hulu will be a nice eater once they release their app as will some better google integration. As for things I hope to see. I would really like an app to view and even manage the shared iPhoto/Aperture libraries on my Mac. This would be nice so I Could play slideshows of all my photos without needing to sync over multiple gigabytes of photos.  The ability to manage the metadata of these libraries would also be a killer feature. The same thing would be nice for video content, that is the ability to browse the network and play video content back that did t come from iTunes, many even with xvid/mkv support. This is more of a pipe dream but I can hope.  Finally I hope to see a wireless sync/media streaming feature from Apple like the AppleTV supports and better controls over automatic downloads and updates of applications and subscriptions.

All in all I like the iPad and am glad I bought it, though there are some minor problems and a lot of opportunities that can all be addressed with software updates and the rid part applications. As an aside I wrote this entire review and posted it from my iPad with minimal effort.

Tuesday, March 30, 2010

Doing Photoshop CS5 Content Aware Fill in GIMP

UPDATE: See the Photoshop CS5 version here.

Ok, so if you haven't seen the new Content Ware Fill feature in CS5 yet check it out here.  I was looking into it and got a link to a GIMP plugin called Resynthesizer.  I decided to play around with it a bit and will compare the same edits in CS5 once its out.  Here are the two tests I did, the first was some small edits to remove a duck, some waves, and the power lines(and shadows).  The second was a larger edit to remove a big tree witch didn't go as well.


Thursday, March 25, 2010

Mixing binary backage and source ports install sources with portupgrade in FreeBSD

Ok so a few weeks ago I made this post about automating update checks and downloads.  While as it turns out there was another issue I ran into.  The problem is simply this:

When using portupgrade -Pa to to FreeBSD updates from packages all updated packages will be installed even if you compile one of the updated packages was compiled locally from the ports tree with custom options or libraries.  This causes any customizations to be lost and possibly version mismatches with system libraries.

The only ways around this problem was to either only upgrade some subset of the ports or to set HOLD_PKGS and manually update problem ports after a package update.  Neither of these solutions is optimal so I took the time to make a patch for portupgrade.

The patch adds a USE_PORTS configuration option that specifies a lit of packages to always build from the ports tree even when portupgrade -P is called.  (The -PP option still works the same as before.)  Thus any custom packages can be added to this list and then an automatic update can be done that will favor binary version when available and when not overridden.  This also means that if one package is built from source its parents and children will still come from binary packages if available.

Build the pached version
Patch, build, and install.
cd /usr/ports/ports-mgmt/portupgrade
sudo make extract
cd work
sudo wget http://pynej.dnsalias.com/Shared/pkgtools-2.4.6-1.patch
sudo patch -p0 < pkgtools-2.4.6-1.patch
cd pkgtools-2.4.6
sudo make isntall clean
You may also want to add portupgrade to your HOLD_PKGS list in /usr/local/etc/pkgtools.conf so it doesn't get replaced in the future.

Configuration
To configure the list of overrides you will need to edit the following section:
sudo vim /usr/local/etc/pkgtools.conf
USE_PORTS = [
    
  ]
Here is a sample of some common overrides.
  •  php5 to enable the apache module
  •  php5-mysql to get the binding to the correct version of mysql-server
  •  mod_perl2 to enable apache module
  •  phpmyadmin as it depends ont he wrong php5-mysql paskage)
sudo vim /usr/local/etc/pkgtools.conf
USE_PORTS = [
    'lang/php5',
    'databases/php5-mysql',
    'databases/phpmyadmin',
    'www/mod_perl2',
  ]

Friday, March 12, 2010

Configure VirtualBox Deamon

A while back I switched from VMware to VirtualBox(when switching to freebsd) and ran into a problem getting virtual machines to start on server boot. Virtual box supports background operation(headless mode) but freebsd does not come with and rc service for doing so. Included below is a freebsd version to accomplish startup/shutdown task as well as other common operations.

To install save this script into /usr/local/etc/rc.d/virtualbox and make it executable. Then add the following lines to your /etc/rc.conf as needed.
# Load the VirtualBox drivers and start any default machines.
vboxnet_enable="YES" # Enable drivers from package virtualbox-ose-kmod.
virtualbox_enable="YES"
virtualbox_autostart="ASG" # List of machine names to start on boot.
virtualbox_user="vboxuser"
virtualbox_group="vboxusers"

A few other notes: I actually set up a separate account for VirtualBox and the daemon supports this. Also please note that the autostart list is done by name and the names can not have spaces. You can also manually start and stop machines with the startvm and stopvm options.

/usr/local/etc/rc.d/virtualbox
#!/bin/sh
#

# PROVIDE: virtualbox 
# REQUIRE: LOGIN vboxnet

#
# Add the following lines to /etc/rc.conf to enable the virtualbox daemon:
#
# virtualbox_enable="YES"
# virtualbox_autostart="BOX1 BOX2"
#


. /etc/rc.subr

name="virtualbox"
rcvar=`set_rcvar`
extra_commands="status startvm stopvm"

start_cmd="${name}_start"
stop_cmd="${name}_start"
status_cmd="${name}_status"
startvm_cmd="${name}_startvm"
stopvm_cmd="${name}_stopvm"
poweroffvm_cmd="${name}_poweroffvm"

load_rc_config $name

virtualbox_user=${virtualbox_user:-"vboxuser"}
virtualbox_group=${virtualbox_group:-"vboxusers"}
virtualbox_autostart=${virtualbox_autostart:-""}

SU="su $virtualbox_user -c"
VBOXMANAGE="/usr/local/bin/VBoxManage -nologo"

virtualbox_start()
{
        echo "Starting ${name}."

        echo $virtualbox_autostart | awk -F , '{for(i=1;i<=NF;i++) print $i}' |  while read VM; do
            $SU "$VBOXMANAGE startvm \"$VM\" --type headless" 
        done
}

virtualbox_stop()
{
        echo "Stopping ${name}."
        $SU "$VBOXMANAGE list runningvms" | sed 's/.*"\(.*\)".*/\1/' | while read VM; do
            $SU "$VBOXMANAGE controlvm \"$VM\" acpipowerbutton"
        done

        wait_for_closing_machines
}

virtualbox_startvm()
{
        $SU "$VBOXMANAGE startvm \"$*\" --type headless"
}

virtualbox_stopvm()
{
        $SU "$VBOXMANAGE controlvm \"$*\" acpipowerbutton"
}

virtualbox_poweroffvm()
{
        $SU "$VBOXMANAGE controlvm \"$*\" poweroff"
}

virtualbox_status()
{

        $SU "$VBOXMANAGE list runningvms" | sed 's/.*"\(.*\)".*/\1/' | while read VM; do
            echo "$VM "
        done
}

wait_for_closing_machines() {
    RUNNING_MACHINES=`$SU "$VBOXMANAGE list runningvms" | wc -l`
    if [ $RUNNING_MACHINES != 0 ]; then
        sleep 5
        wait_for_closing_machines
    fi
}

run_rc_command "$@"

Friday, March 5, 2010

Setting up FreeBSD to Auto-Download and Notify Updates

03/11/2010- Update: Updated the portsnap command to properly apply the port updates. As configured before the changes would show up but the cron task to download packages would never download them.

Overview
The default install of FreeBSD is very stable, and works well. And it is relatively simple manually do updates, but I recent looked into setting up auto-updates like Ubuntu does. The way I have it et up now is the following.

Automatic downloading of kernel/world updates to the FreeBSD release.
Automatic downloading and updating of the current ports tree.
Automatic downloading of any updated binary packages of installed ports.

These three tasks are set as cron jobs and run once a day/week to check for and download updates. Reports are also sent to the root account on checking so you will be notified where updates are available. The administrator can then manuals install the system updates, binary packages updates, and source port updates from the local cache.

Setup
First off we will add a few cron jobs to auto-download our updates. Add these lines to /etc/cron and customize the run time as desired.
# Check for freebsd updates, download them, and mail root.
0       2       *       *       0       root    freebsd-update cron
# Check for ports updates, download them, and mail root.
0       3       *       *       0       root    portsnap cron update && pkg_version -vIL=
# Check for binary pacakge updates, download them, and mail root.
0       4       *       *       0       root    portupgrade -PFa


To enable the email reports you need to add an alias to send mail to forward root's mail to an administrator. To do so edit the file /etc/aliases and add line like so with your username.
root: adminaccount
Then run the following command to make the change take effect.
cd /etc/mail && sudo make aliases

You will also need to install the portutils package if you don't have it for package updating.
cd /usr/ports/ports-mgmt/portupgrade && sudo make install

Once installed we need to change the package source location to pull binary package updates from the stable branch instead of the release branch.  The release packages are never updated and as such we would never find binary updates. To change this edit the /usr/local/etc/pkgtools.conf file and change the PKG_SITES variable to the following.
PKG_SITES = [
    sprintf('ftp://ftp.freebsd.org/pub/FreeBSD/ports/%s/packages-%s-stable/', OS_PLATFORM, OS_MAJOR)  
  ]

Unfortunately the  portupgrade utility does not respect packages you customized and build by hand and will just overwrite them with the binary version.  To get around this you can add any exceptions you want to HOLD_PKGS array in this file and update them manually.  You way also want to add any languages you don't use to the IGNORE_CATEGORIES array at this time as well to speed up the ports commands.

Manual Update
Once all these steps are done we can force a manual update of all three with the following commands, though they will take a bit to complete.
sudo freebsd-update fetch
sudo portsnap fetch update
sudo portupgrade -PFa

Installing Updates
If using ZFS you may want to make a snapshot first.
sudo zfs snapshot zroot@ver-date
sudo zfs snapshot zroot/usr@ver-date

When you want to do an actual update to the system here are the commands to install the downloaded updates.
sudo freebsd-update install
sudo portupgrade -Pa

And finally its a good idea to clean out the old files manually or via another cron task..
portsclean -CDPL

If everything went smoothly you may wish to remove the old snapshots.
sudo zfs destroy zroot@ver-date
sudo zfs destroy zroot/usr@ver-date

Tuesday, February 23, 2010

Set up the transmission-deamon BitTorrent Client in FreeBSD

I switched over to FreeBSD a while back and still am in the process of configuring it the way my Ubuntu server used to be set up. One of the things I used to have was uTorrent running, via wine, and auto-loading torrents from a shared directory. This allowed me to queue downloads from anywhere and have them auto-download. It is not possible to set up my 32bit FreeBSD box the same was as ZFS prevents wine from operating. (This is a known issue due to the custom kernel with an increased memory map.)

As such I was looking for a similar solution that would run as a daemon and could automatically process torrent files. And as it turns out the transmission-daemon package does exactly that. Following is a brief review of setting up this service and some customizations I did.

Tuesday, February 16, 2010

Convert XML to Array and Array to XML in PHP

This class library provides two XML related functions.  One to convert an XML Tree into a PHP array and another to convert a complex PHP object into XML.


The first is the xml_to_array function witch will read through an entire xml tree and convert it into a single multi-dimensional array.  That is each node in the root node will be added as items in the array and all children and properties will be added to the respective items.  This is done in a completely recursive manner so that nodes within nodes within nodes will be fully read and created as arrays within arrays within arrays.  The exact format of the generated array is dependent on the options selected.

The default options will merge all the properties and children directly into the node but this may need to be disabled if you have children with the same name as properties or if you need to distinguish between the two types.

Here is a sample XML file, from a svn dump.
svn log --non-interactive --xml
<?xml version="1.0"?>
<log>
<logentry
   revision="114">
<author>pynej</author>
<date>2010-01-11T14:20:42.200771Z</date>
<msg>Removed smarty 2.0 code.
</msg>
</logentry>
<logentry
   revision="113">
<author>pynej</author>
<date>2008-08-08T05:14:31.046815Z</date>
<msg>* Changed videos to search recursively.  This may be configured by an extra variable in the future.</msg>
</logentry>
</log>

Calling the conversion with the default options would look like so.
print_r(xmlutils::xml_to_array($xml));
Array
(
    [name] => log
    [0] => Array
        (
            [name] => logentry
            [revision] => 114
            [author] => pynej
            [date] => 2010-01-11T14:20:42.200771Z
            [msg] => Removed smarty 2.0 code.
        )

    [1] => Array
        (
            [name] => logentry
            [revision] => 113
            [author] => pynej
            [date] => 2008-08-08T05:14:31.046815Z
            [msg] => * Changed videos to search recursively.  This may be configured by an extra variable in the future.
        )
)

Where as the call with no options generates the more detailed but less user friendly output.
print_r(xmlutils::xml_to_array($xml), 0);
Array
(
    [name] => log
    [children] => Array
        (
            [0] => Array
                (
                    [name] => logentry
                    [attributes] => Array
                        (
                            [revision] => 114
                        )
                    [children] => Array
                        (
                            [0] => Array
                                (
                                    [name] => author
                                    [value] => pynej
                                )
                            [1] => Array
                                (
                                    [name] => date
                                    [value] => 2010-01-11T14:20:42.200771Z
                                )
                            [2] => Array
                                (
                                    [name] => msg
                                    [value] => Removed smarty 2.0 code.
                                )
                        )
                )

            [1] => Array
                (
                    [name] => logentry
                    [attributes] => Array
                        (
                            [revision] => 113
                        )
                    [children] => Array
                        (
                            [0] => Array
                                (
                                    [name] => author
                                    [value] => pynej
                                )
                            [1] => Array
                                (
                                    [name] => date
                                    [value] => 2008-08-08T05:14:31.046815Z
                                )
                            [2] => Array
                                (
                                    [name] => msg
                                    [value] => * Changed videos to search recursively.  This may be configured by an extra variable in the future.
                                )
                        )
                )
        )
) 

A more useful format might be to retail the attribute/children breakdown but processes the rest.
print_r(xmlutils::xml_to_array($xml), xmlutils::XML_MERGE_ATTRIBUTES | xmlutils::XML_VALUE_PAIRS | xmlutils::XML_MERGE_VALUES);
Array
(
    [name] => log
    [children] => Array
        (
            [0] => Array
                (
                    [name] => logentry
                    [revision] => 114
                    [children] => Array
                        (
                            [author] => pynej
                            [date] => 2010-01-11T14:20:42.200771Z
                            [msg] => Removed smarty 2.0 code.
                        )
                )

            [1] => Array
                (
                    [name] => logentry
                    [revision] => 113
                    [children] => Array
                        (
                            [author] => pynej
                            [date] => 2008-08-08T05:14:31.046815Z
                            [msg] => * Changed videos to search recursively.  This may be configured by an extra variable in the future.
                        )
                )
        )
) 


The second function array_to_xml will to the inverse of this and will generate a XML Tree from a complex anonymous array object.  This object can contain any amount of data and will be recursively traversed and added to the tree.

Also note that XML Tree's cant have shared nodes or references so if any exist in the source object the data in them will be duplicated in the XML Tree.  There is no way to preserve these references with this tool.  Also note that no recursion checks are done so an object with circular recursion will lock up the process. 

The following array converted to XML will look like so.
print_r($logList);
Array
(
    [name] => log
    [0] => Array
        (
            [name] => logentry
            [revision] => 114
            [author] => pynej
            [date] => 2010-01-11T14:20:42.200771Z
            [msg] => Removed smarty 2.0 code.
        )

    [1] => Array
        (
            [name] => logentry
            [revision] => 113
            [author] => pynej
            [date] => 2008-08-08T05:14:31.046815Z
            [msg] => Array
                (
                    [0] => * Added links to the debug section to view the contents of ajax calls.
                    [1] => * Added query->get_md5 to calculate the md5 hash of a query result.
        )
)

print_r(xmlutils::array_to_xml($logList));
<?xml version="1.0" encoding="utf-8"?>
<data>
 <name>log</name>
 <data-item>
  <name>logentry</name>
  <revision>114</revision>
  <author>pynej</author>
  <date>2010-01-11T14:20:42.200771Z</date>
  <msg>Removed smarty 2.0 code.</msg>
 </data-item>
 <data-item>
  <name>logentry</name>
  <revision>113</revision>
  <author>pynej</author>
  <date>2008-08-08T05:14:31.046815Z</date>
  <msg>
    <msg-item>* Added links to the debug section to view the contents of ajax calls.</msg-item>
    <msg-item>* Added query->get_md5 to calculate the md5 hash of a query result.</msg-item>
  </msg>
 </data-item>
</data>


Source Code:
xmlutils.php
/**
 * This class contains mothods to convert a xml tree into a complex array with nested properties and to convert a complex array object into an xml tree.
 *
 * @package xml-utils
 * @author Jeremy Pyne <jeremy.pyne@gmail.com>
 * @license CC:BY/NC/SA  http://creativecommons.org/licenses/by-nc-sa/3.0/
 * @lastupdate February 16 2010
 * @version 1.5
 */
final class xmlutils
{
       /**
         * Add a levels attributes directly to the levels node instead of into an attributes array.
         *
         */
        const XML_MERGE_ATTRIBUTES = 1;
        /**
         * Merge the attribures of a level into the parent level that they belong to.
         *
         */
        const XML_MERGE_VALUES = 2;
        /**
         * Add a levels children directly to the levels node instead of into a children array.
         *
         */
        const XML_MERGE_CHIILDREN = 4;
        /**
         * Process value as a lone entry under their level and ignore the other attributes and children.
         *
         */
        const XML_VALUE_PAIRS = 8;
        /**
         * Split the value of a node into an array on newlines.
         *
         */
        const XML_SPLIT_VALUES = 16;
        /**
         * If a value is an array with a single item, just use the item.
         *
         */
        const XML_SPLIT_SHIFT = 32;

        /**
         * This function will convert an XML tree into a multi-dimentional array.
         *
         * @param SimpleXMLElement $xml
         * @param bitfield $ops
         * @return array
         */
        public static function xml_to_array($xml, $ops=63) {
                // Store the name of this level.
                $level = array();
                $level["name"] = $xml->getName();

                // Grab the value of this level.
                $value = trim((string)$xml);

                // If we have a value, process it.
                if($value) {
                        // Split the value into an array on newlines.
                        if($ops & self::XML_SPLIT_VALUES)
                                $value = explode("\n", $value);

                        // If the value is an array with one item, remove the array.
                        if($ops & self::XML_SPLIT_SHIFT)
                                if(sizeof($value) == 1)
                                        $value = array_shift($value);

                        // Store the value of this level.
                        $level["value"] = $value;
                }

                // If this level had a value just return the name/value as an array.
                if($ops & self::XML_VALUE_PAIRS && array_key_exists("value", $level))
                        return array($level["name"] => $level["value"]);

                // Loop through each atribute of this level.
                foreach($xml->attributes() as $attribute) {
                        // Add each attribure directly to this level in the array.
                        if($ops & self::XML_MERGE_ATTRIBUTES)
                                $level[$attribute->getName()] = (string)$attribute;
                        // Add all the attributes to an attributes array under this level in the array.
                        else
                                $level["attributes"][$attribute->getName()] = (string)$attribute;
                }

                // Loop through each child of this level.
                foreach($xml->children() as $children) {
                        // Get an array of this childs data.
                        $child = self::xml_to_array($children, $ops);

                        if($ops & self::XML_MERGE_VALUES) {
                                // Add each child directly to this level  or to the children array of this level in the array.
                                if(sizeof($child) == 1) {
                                        // If there is only one child then merge it up.
                                        if($ops & self::XML_MERGE_CHIILDREN)
                                                $level[array_shift(array_keys($child))] = $child[array_shift(array_keys($child))];
                                        else
                                                $level["children"][array_shift(array_keys($child))] = $child[array_shift(array_keys($child))];
                                } elseif(array_key_exists("value", $child)) {
                                        // If there is a value key then merge it up.
                                        if($ops & self::XML_MERGE_CHIILDREN)
                                                $level[$child["name"]] = $child["value"];
                                        else
                                                $level["children"][$child["name"]] = $child["value"];
                                } elseif(array_key_exists("children", $child)) {
                                        // If there are children, then merge them up.
                                        if($ops & self::XML_MERGE_CHIILDREN)
                                                $level[] = $child;
                                        else
                                                $level["children"][] = $child;
                                } else {
                                        // Otherwise just assigne yourself.
                                        if($ops & self::XML_MERGE_CHIILDREN)
                                                $level[] = $child;
                                        else
                                                $level["children"][] = $child;
                                }
                        } else {
                                $level["children"][] = $child;
                        }
                }


                return $level;
        }

        /**
        * The main function for converting to an XML document.
        * Pass in a multi dimensional array and this recrusively loops through and builds up an XML document.
        *
        * @param array $data
        * @param string $rootNodeName - what you want the root node to be - defaultsto data.
        * @param SimpleXMLElement $xml - should only be used recursively
        * @return string XML
        */
        public static function array_to_xml($data, $rootNodeName = 'data', $xml=null, $parentXml=null)
        {

                // turn off compatibility mode as simple xml throws a wobbly if you don't.
                if (ini_get('zend.ze1_compatibility_mode') == 1)
                {
                        ini_set ('zend.ze1_compatibility_mode', 0);
                }
                //if ($rootNodeName == false) {
                //      $xml = simplexml_load_string("<s/>");
                //}
                if ($xml == null)
                {
                       $xml = simplexml_load_string("<?xml version='1.0' encoding='utf-8'?><$rootNodeName />");
                }

                // loop through the data passed in.
                foreach($data as $key => $value)
                {
                        // Create a name for this item based off the attribute name or if this is a item in an array then the parent nodes name.
                        $nodeName = is_numeric($key) ? $rootNodeName . '-item' : $key;
                        $nodeName = preg_replace('/[^a-z1-9_-]/i', '', $nodeName);

                        // If this item is an array then we will be recursine to the logic is more complex.
                        if (is_array($value)) {
                                // If this node is part of an array we have to proccess is specialy.
                                if (is_numeric($key)) {
                                        // Another exception if this is teh root node and is an array.  In this case we don't have a parent node to use so we must use the current node and not update the reference. 
                                        if($parentXml == null) {
                                                $childXml = $xml->addChild($nodeName);
                                                self::array_to_xml($value, $nodeName, $childXml, $xml);
                                        // If this is a array node then we want to add the item under the parent node instead of out current node. Also we have to update $xml to reflect the change.
                                        } else {
                                                $xml = $parentXml->addChild($nodeName);
                                                self::array_to_xml($value, $nodeName, $xml, $parentXml);
                                        }
                                } else {
                                        // For a normal attribute node just add it to the parent node.
                                        $childXml = $xml->addChild($nodeName);
                                        self::array_to_xml($value, $nodeName, $childXml, $xml);
                                }
                        // If not then it is a simple value and can be directly appended to the XML tree.
                        } else {
                                $value = htmlentities($value);
                                $xml->addChild($nodeName, $value);
                        }
                }

                // Pass back as string or simple xml object.
                return $xml->asXML();
        }

Wednesday, February 10, 2010

Find Duplicate Files in the Terminal

I posted an Automator Service last week for finding duplicate photo's in an iPhoto Library.  Here is a slightly modified version of the internal script it uses. You can save this script and run it in a terminal to find duplicate file of any kind in any directory tree of your choice.  This can also be included in Automater actions itself with the Shell Script action.

findDuplicates.pl
#!/usr/bin/perl

# ##################################### #
# Filename:      findDuplicates.pl
# Author:        Jeremy Pyne
# Licence:       CC:BY/NC/SA  http://creativecommons.org/licenses/by-nc-sa/3.0/
# Last Update:   02/10/2010
# Version:       1.5
# Requires:      perl
# Description:
#   This script will look through a directory of files and find and duplicates.  It will then
#   return a list of any such duplicates it finds.  This is done by calculating the md5 checksum
#   of each file and recording it along with the filename.  Then the list is sorted by the checksum
#   and read in line by line.  Any time multiple records in a row share a checksum the file names
#   are written out to stdout.  As a result all empty files will be flagged as duplicates as well.
# ##################################### #

# Get the path from the command line.  Thos could be expanded to provide more granular control.
$dir = shift;

# Set up the location of the temp files.
$file = "/tmp/pictures.txt";
$sort = "/tmp/sorted.txt";

# Find all files in the selected directory and calculate their md5sum.  This is by far the longest step.
`find "$dir" -type file -print0 | xargs -0 md5 -r > $file`;
# Sort the resulting file by the md5sum's.
`sort $file > $sort`;

open FILE, "<$sort" or die $!;

my $newmd5;
my $newfile;
my $lastmd5;
my $lastfile;
my $lastprint = 0;

# Read each line fromt he file.
while() {
        # Extract the md5sum and the filename.
        $_ =~ /([^ ]+) (.+)/;

        $newmd5 = $1;
        $newfile = $2;

        # If this is the same checksum as the last file then flag it.
        if($1 =~ $lastmd5)
        {
                # If this is the first duplicate for this checksup then print the first file's name.
                if(!$lastprint)
                {
                        print("$lastfile\n");
                        $lastprint = 1;
                }
                # Print the conflicting file's name/
                print("$newfile\n");
        }
        else
        {
                $lastprint = 0;
        }

        # Record the last filename and checksup for future testing.
        $lastmd5 = $newmd5;
        $lastfile = $newfile;
}

close(FILE);

# Remove the temp files.
unlink($file);
unlink($sort);

Tuesday, February 9, 2010

Switch Statment for Smarty 3

Here is the updated {switch} statement for Smarty 3. The new version is NOT backwards compatible but the Smarty 2 version is still maintained here.

11/23/2010 - Updated to version 3.5
Updated to work with Smarty 3.0 release. (Tested on 3.0.5).
I removed the code from this posting, it is now available on github here: https://github.com/pynej/Smarty-Switch-Statement/archives/Smarty-3.0

10/28/2010 - Updated to version 3.3
I have added this project to GitHub at http://github.com/pynej/Smarty-Switch-Statement.

02/25/2010 - Updated to version 3.3
Please note that this update is required for version 3.0b6 or grater. The change is simple renaming the execute methods to compile but it not backwards compatible. The Smarty3.0b5 and below version is still available here.

02/09/2010 - Updated to version 3.2
Fixed a bug when chaining case statements without a break.

02/09/2010 - Updated to version 3.1
Updated the plug-in to once again support the shorthand format, {switch $myvar}. To enable this feature you must add the following line to you code somewhere before the template is executed.
$smarty->loadPlugin('smarty_compiler_switch');
If you do not add said line the long hand form will still work correctly.

sample.php
/**
* Sample usage:
* <code>
* {foreach item=$debugItem from=$debugData}
*  // Switch on $debugItem.type
*    {switch $debugItem.type}
*       {case 1}
*       {case "invalid_field"}
*          // Case checks for string and numbers.
*       {/case}
*       {case $postError}
*       {case $getError|cat:"_ajax"|lower}
*          // Case checks can also use variables and modifiers.
*          {break}
*       {default}
*          // Default case is supported.
*    {/switch}
* {/foreach}
* </code>
*
* Note in the above example that the break statements work exactly as expected.  Also the switch and default
*    tags can take the break attribute. If set they will break automatically before the next case is printed.
*
* Both blocks produce the same switch logic:
* <code>
*    {case 1 break}
*       Code 1
*    {case 2}
*       Code 2
*    {default break}
*       Code 3
* </code>
*
* <code>
*    {case 1}
*     Code 1
*       {break}
*    {case 2}
*       Code 2
*    {default}
*       Code 3
*       {break}
* </code>
*
* Finally, there is an alternate long hand style for the switch statements that you may need to use in some cases.
*
* <code>
* {switch var=$type}
*    {case value="box" break=true}
*    {case value="line"}
*       {break}
*    {default}
* {/switch}
* </code>
*/

Monday, February 8, 2010

Creating Acrobat Digital Signatures with a Root CA for Validation

Recently I was looking into using Adobe PDF Signing. This feature requires that each user have a digital certificate for each user. The problem is that creating the default signatures in Acrobat then every certificate to be imported on every other computer. That is to set up 10 users to all properly authenticate signatures you would have to import 10 signatures onto 10 computers witch becomes prohibitively complex.

There is another option. If the users certificates are all signed with a single CA(Certificate Authority) then only the CA needs to get imported to get all the certificate validation working. This is the approach I used but it is not internally supported by Acrobat and requires a Linux box to create the certificates. This guide will show you how to create a CA and signed digital certificates for your users. Then you simply import the single CA into each computer along with the actual users certificate.

Requirements:
  • OpenSSL is required to do most of the work.
  • Acrobat Reader is all that is required on the user computers.
  • One copy of Acrobat Standard is needed to enable digital Digital Rights management on PDF files.

Creating the Certificate Authority:
Run the following command to generate new CA under the current directory. You need to make sure this is in a secure path.
/usr/share/ssl/misc/CA.pl -newca
The password prompt is the CA password and is needed by the administrator when signing new certificates. The rest of the prompts create the CA identification and signature and can not be changed once set. Once finished the demoCA directory can be moved and renamed as necessary.

Once done you need to edit the /etc/ssl/openssl.cnf configuration file and update the CA_default.dir variable.
[ CA_default ]
dir = /root/keys/CompanyCA

Create an acrobat.cnf configuration for creating user certificates.
echo keyUsage=digitalSignature, dataEncipherment > acrobat.cnf
echo 1.2.840.113583.1.1.10=DER:05:00 >> acrobat.cnf

Next you probably want to extend the CA expiration date beyond one year. The following command will extend it to ten years.
openssl x509 -in cacert.pem -days 3650 -signkey ./private/cakey.pem -out cacert.pem

Finally the cacert.pem to a shared location and rename it to end with a .cer file extension so that the clients can import it. This is the public CA certificate used for validating certificates.


Create a Users Digital Certificate:
Create the new users certificate. You will be prompted to enter the end users password that they will type to sign documents.
/usr/share/ssl/misc/CA.pl -newcert

Now run the next command to sign the generated certificate with the CA. You will be prompted for the CA password.
openssl x509 -in newcert.pem -CA cacert.pem -CAkey private/cakey.pem -CAcreateserial -out newcert.pem -days 3650 -clrext -extfile acrobat.cnf

Finally run the following command to export this certificate as a PKCS12 package witch Acrobat can import.
cat newkey.pem newcert.pem  | openssl pkcs12 -export > username.pfx

You can now copy this file out to the same shared location at the CA. It is password protected and the certificates can be extracted from it in the future so a backup of the generated new*.pem files is not needed.

To extract the certificate and keys you can run the flowing commands.
openssl pkcs12 -in username.pfx -nokeys -out newcert.pem
openssl pkcs12 -in username.pfx -nocert -out newkey.pem


Import the Certificate Authority and Users Digital Certificate:
On any computers that need to be able to validate signatures all you need to do is import the CA file. To do so simply open up Acrobat and go to Document->Manage Trust Identities. Then browse for the *.cer CA file and import it. After importing you need to select the certificate, select Trust, and check the Use this Certificate as a Trusted Root option.

To enable a user to sign documents on a computers you need to do the following steps. Open up Acrobat and go to Document->Security Settings. Then click Add ID and browse for the proper users *.pfx file. You will need to enter the users password once to install the certificate but users will still need to enter the password when signing documents. These certificates are still password protected so multiple signatures can be loaded onto the same computer without issue.

Friday, January 29, 2010

Print to PDF from the Linux Terminal

A while back I had to set up a system for printing reports to PDF files automatically. IE: I needed a script to do the conversion, retrieve the new file, fix the orientation, and return the new filename. Here is the script and the details and the requirements.

Prerequisites:
  • CUPS-PDF: This package provides a PDF printer that we can print to using lp.
  • TexLive: This is a large project with many tools and has a large footprint but it is necessary for possessing landscape jobs. The exact problem is that jobs printed in landscape will be miss oriented when viewed and this allows us to correct that problem.
  • pdfjam: The project listed but does not need to be installed, rather a custom version of the pdf90 script included in this project is needed. Specifically the script is customized to rotate the page counter-clockwise.
Files:
  • printpdf: This is the main script and can be called from any external tools.
  • pdf90minus: This is the modified version of pdf90 from pdfjam that rotates the pages of a PDF counter-clockwise.
  • texlive.profile: This is a installer configuration for TexLive with just the necessary components selected.
Configuration:

Install CUPS-PDF and configure a printer for it. To configure the printer you can use the CUPS web interface or add the following lines manually.
/etc/cups/printers.conf
<printer pdf="">
Info PDF Writer for CUPS
Location PDF Backend /usr/lib64/cups/backend/pdf-writer
DeviceURI pdf-writer:/tmp/
State Idle
Accepting Yes
JobSheets none none
QuotaPeriod 0
PageLimit 0
KLimit 0
</printer>

Install TexLive. To install the minimal required components should download the installer and the profile and extract them to the same location. then run the following command from that folder.
sudo ./install-tl −profile texlive.profile

Save the pdf90minus and pdfprint scripts to the same location. You may wish to customize the working path /tmp but it must be the same in the printer configuration and printpdf script.

Usage:

You can now test the PDF printing, the job will print and the PDF will be generated at the same path with the same name as teh original file only suffixed with .pdf.
./printpdf myfile.txt [--rotate|-r] [--save|-s]

The --rotate option causes the job to be printed in landscape mode and then the PDF pages to be reoriented to display properly.
The --save option causes the source file to be left behind and not deleted once successful printed.
The script will block execution until the print job has finished and will then return passing the new filename to STDOUT.

Auto Mount NFS Shares via Bonjour

07/21/2011 - Update
It papers this site is no longer available.  As such I have posted the original script here and the automated workflow is  here.

There are also installation instructions for OSX 10.7 which is working but requires some extra setup and Xcode must also be installed before the scripts.

Installation:
  • Download the two file above and extract them someplace.
  • Drag the Automator action into our Applications folder and add it to your user accounts Login Items list so that it will automatically run each login.
  • Setup the background script to do the actual work.
Open up the Terminal application and locate the directory you saved the script into.
cd ~/Downloads

Run the following commands to install the script locally.
sudo mkdir -p /usr/local/bin
sudo cp bonjournfsmd.rb /usr/local/bin/bonjournfsmd.rb
sudo chown root:wheel /usr/local/bin/bonjournfsmd.rb
sudo chmod +x /usr/local/bin/bonjournfsmd.rb

Run the following commands to install some dependancies required on OSX 10.7 only.
sudo gem install dnssd
sudo gem install daemons

A wile back I switched my server over to FreeBSD/ZFS and ended up changing the shared volumes to use the NFS features of ZFS.
There were a few minor issues with the initial configuration and the OSX clients but this was not to difficult to resolve. Specifically the NFS system does not allow for user account mapping, but rather the accounts on both the server and client must be identical. Furthermore this mapping is not done by username, but rather by the UID of each user. On OSX the UID start at 501 where as on FreeBSD they default to 1000. The best approach to fix this problem is simply to update the account on the BSD box to use the same UID as OSX. (It is possible to change UID in OSX but not recommended.) After this fix everything was working correctly including write access and ACL lists.
The other thing I wanted to do, and the reason for this post, was to have my OSX desktop automatically map these volumes on boot. I found a simple Bonjour NFS share Mounter Daemon, http://svwtech.com/site, that can be run from the terminal and will do exactly that but I was unable to get the script to run at boot. In the end I had to create a Automator application to run the script and then add that application to my startup items.
You can download the Application with the above auto-mount script embedded in it here.

Find Duplicate Photos in an iPhoto Library

03/04/2011- Update: Updated the service with some fixes for invalid paths and quoting problems.
06/23/2016- Update: Updated download link. I'm not really sure if this still works with newer versions of iPhoto or Photo's though.

There are many shareware tools for finding duplicate pictures in an iPhoto library but this should be a simple operation, and honestly shouldn't require a fee to utilize. As a result I created a simple Service via Automator to solve this problem.